How to Photograph Summer Wildflowers: From Alpine Meadows to Your Own Backyard

How to Photograph Summer Wildflowers:
From Alpine Meadows to Your Own Backyard
A complete guide to finding, framing, and capturing the fleeting beauty of wildflower season!

Wildflower season is one of the most anticipated windows in a nature photographer's year and one of the most humbling! You can do everything right and still arrive two weeks too early or too late, or watch a perfect morning dissolve into harsh midday sun before you've had your coffee. Wildflowers don't wait, and they don't reschedule!
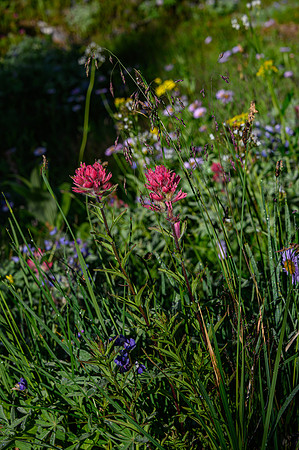
But when the timing, light, and location come together, there is almost nothing more rewarding to photograph. A hillside covered in lupine at golden hour. A single columbine catching backlight in a forest clearing. Indian paintbrush spilling down a rocky mountain slope with a glacier-capped peak behind it. These are images that require no explanation, no caption, no context. Just a viewer who stops and feels something!
This guide is for all of it, from the epic alpine hikes to the dandelions pushing through the sidewalk crack outside your door!
When and Where to Find Wildflowers
The most important thing to understand about wildflower photography is that timing changes everything, and no two years are the same. Bloom timing depends on snowpack levels, winter temperatures, spring rainfall, and growing-degree days, which means a location that was carpeted in blooms in mid-July one year might peak two weeks earlier or later the next.
For alpine and mountain wildflowers, the bloom window in the Pacific Northwest typically runs from late June through August depending on elevation. Higher elevations bloom later. A trail at 6,000 feet might be at peak color two to three weeks after a trail at 3,000 feet. Hurricane Ridge in Olympic National Park and the meadows around Mount Rainier (Paradise and Sunrise) are among the most reliable and accessible high-country wildflower locations in Washington, but nearly every mountain range in the region has its own local gems.
For lower-elevation and roadside wildflowers, the season starts much earlier — often as soon as April in the lowlands of the Willamette Valley and Puget Sound region, with different species cycling through from spring through late summer. Camas, trillium, Indian plum, and bleeding heart lead the season; balsamroot, lupine, and paintbrush follow in late spring; and late summer brings asters, goldenrod, and Queen Anne's lace.
Resources for finding where flowers are blooming right now:
- Washington Trails Association's hiking reports include current bloom status on popular routes, updated by recent hikers
- Instagram geotags and hashtags like #PNWWildflowers, #WildflowerSeason, and region-specific tags are often the most current real-time information available
- Northwest Wildflowers for their bloom map (If you live outside of the PNW, google "wildflowers" and your area
The Alpine Hike: Planning for Peak Wildflower Photography
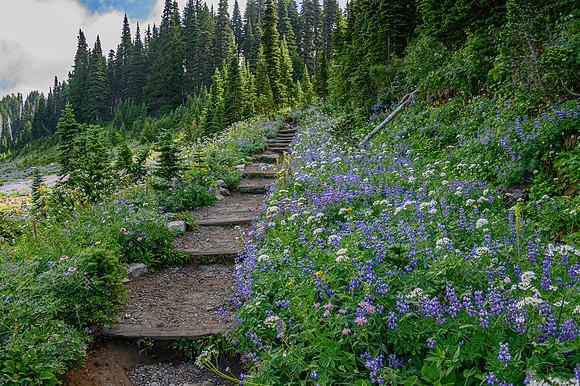
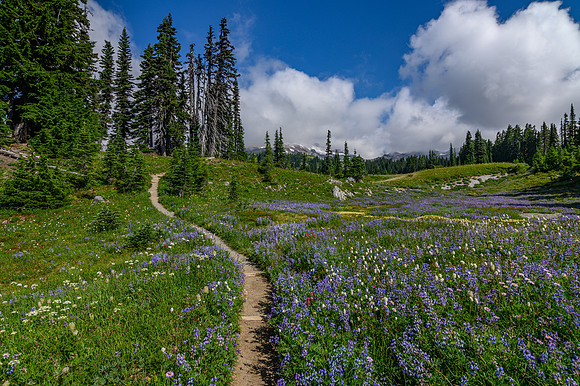
High-country wildflower photography is the most logistically demanding kind, but the results of sweeping meadows of color with mountain peaks as backdrops are some of the most striking landscape images you can make in the Pacific Northwest!
Plan your timing, not just your location. Snowpack varies dramatically year to year, and a trail that's accessible in early July one year might be under snow until August the next. Check Washington Trails Association or the specific national park or ranger district website for current conditions before you go.
Start early. This is advice for virtually all landscape photography, but it matters especially for wildflowers at elevation. Morning light is soft and directional, the wind that plagues many alpine meadows tends to be calmer in the early hours (crucial for sharp images of flowers), and the colors in both sky and flowers are richer before midday flattens everything out!
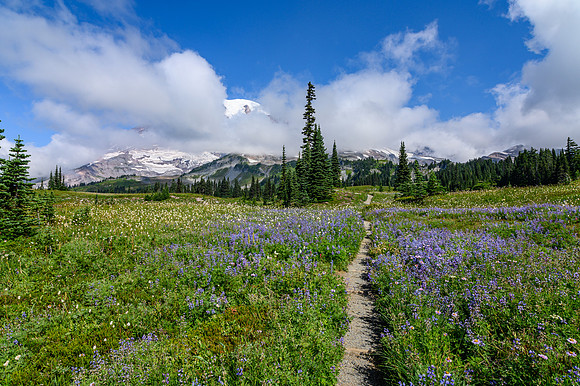
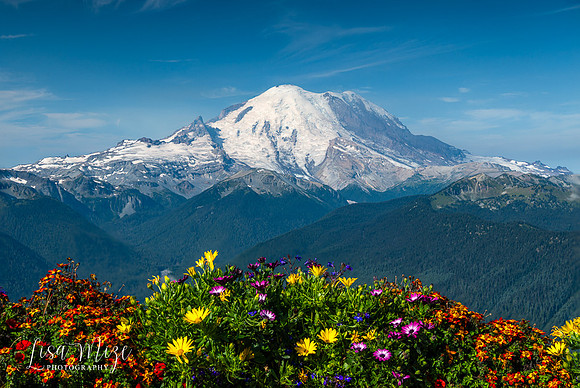
The classic alpine wildflower composition uses flowers in the foreground with a mountain peak, snow field, or dramatic sky in the background. This works because it creates a sense of depth, gives the eye two distinct points of interest, and establishes a sense of place. The challenge, and we'll deal with this in the focus section below, is that getting both the foreground flowers and the distant mountain sharp at the same time is optically difficult to do in a single frame.
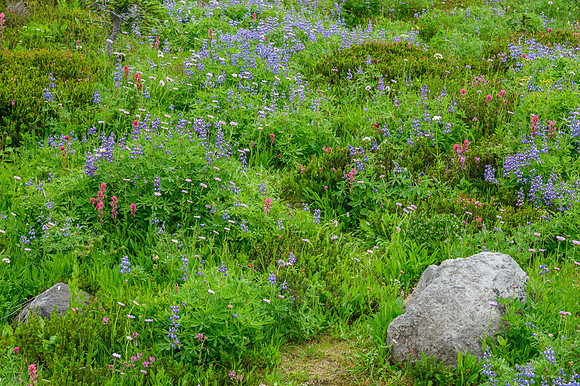
Look for complementary colors. Some of the most striking wildflower images aren't just "lots of flowers" but they're specific color combinations that create visual contrast. Purple lupine against a yellow balsamroot meadow. Red paintbrush against gray volcanic rock. Blue sky with white daisy fields below it. Training your eye to notice color relationships, not just individual flowers, will elevate your compositions immediately!
Stay on trail. This one is worth saying directly: alpine meadows are ecologically fragile in ways that aren't always visible from the trail's edge. The soil crusts that support wildflowers can take decades to recover from foot traffic. Photograph from the trail, use a longer lens to reach flowers you can't access without stepping off the path, and model the behavior you'd want other photographers to replicate!
Filling the Frame With Flowers
One of the most reliable techniques in wildflower photography, and one beginners consistently under-use: get close and fill your frame!
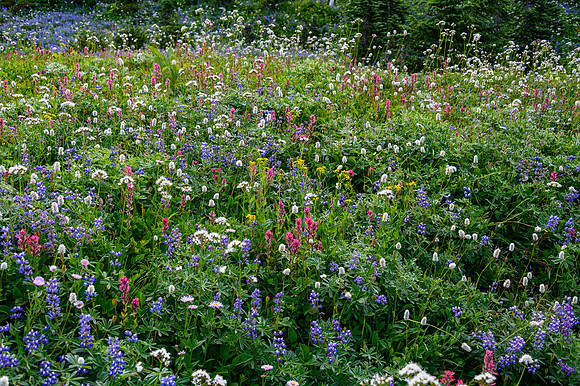
The instinct when standing in a field of wildflowers is to try to show the whole field. Step back. Capture everything. Show the scale. And sometimes that's exactly the right move! A wide meadow shot with context and sky can be extraordinary!
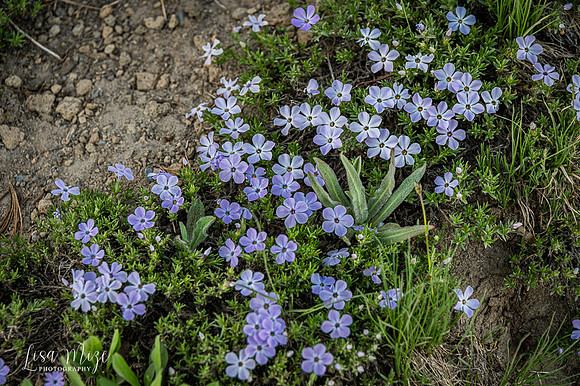
But just as often, the image that stops people is the one where you've gotten close enough that a single cluster of flowers fills the entire frame. No sky, no horizon, no competing background elements, just the flower in front of you, occupying every inch of the image.
Getting low changes everything. The most effective positions for filling the frame with flowers aren't standing, but they're crouching, kneeling, or lying flat on the ground. Getting your camera to roughly the height of the flower, rather than looking down at it, gives you an entirely different relationship between subject and background. Suddenly the background becomes a sweep of color (other flowers blurring into a soft backdrop) rather than a patch of dirt or a muddy trail.
Use a macro or close-focusing lens for the most intimate work. You don't necessarily need a dedicated macro lens as many standard 50mm and 85mm lenses will focus close enough for striking flower detail work. But a true macro lens (typically labeled 1:1) allows you to get genuinely close, filling the frame with a single petal or a bee landing on a stamen in a way no other lens can.
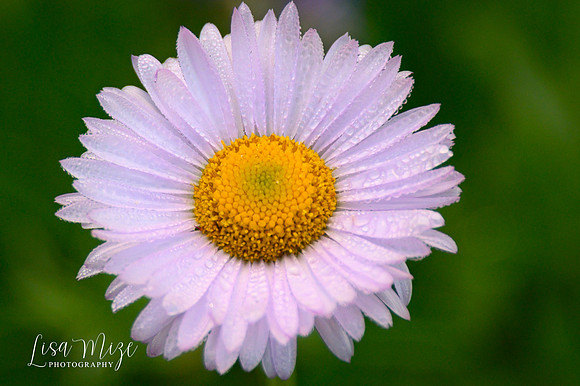
Look for what makes this particular flower interesting. Wildflower photography at its most generic is just "flower in a field." At its most compelling, it's noticing that this specific lupine stalk has a bee feeding on it, or that this particular Indian paintbrush is backlit in a way that makes it glow like stained glass, or that the dew on these petals is catching the morning light in a way that turns each drop into a tiny lens. The difference between a generic flower photo and an extraordinary one is usually just attention by looking at what's actually in front of you rather than what you assumed you'd find.
Using Wildflowers as a Foreground Element
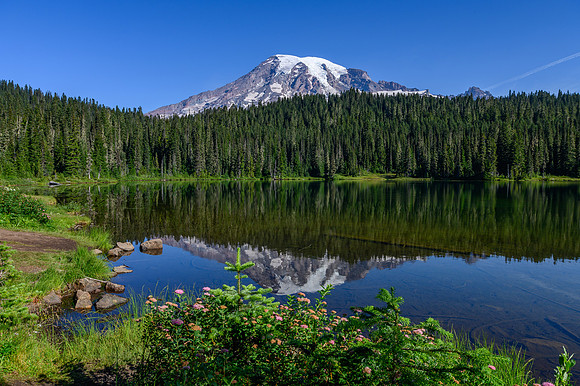
The other major wildflower composition approach is almost the opposite of filling the frame. It is using flowers as a foreground anchor for a larger landscape!
This technique works because it creates a visual entry point. The eye naturally lands on whatever is closest and sharpest in the frame, then travels back into the image toward the background. A cluster of wildflowers in the lower third of your frame draws the viewer in, then leads them to the mountain, the valley, the sunset, or the lake behind it.
Position your camera low and close to the foreground flowers, then compose so that the flowers occupy the bottom quarter to third of the frame and the background subject occupies the rest. The flowers should be in or very near focus; the background can range from fully sharp to softly blurred depending on the look you're after.
Lateral position matters as much as distance. Don't just put the camera behind any available flower, but choose flowers with good color, shape, and separation from one another. A tangled mass of indistinct stems at the bottom of the frame is distracting; a few clearly defined flower heads with some breathing room between them lead the eye rather than confusing it.
Consider the relationship between the foreground color and the background. The most striking foreground-background wildflower compositions are usually ones where the foreground color either contrasts or harmonizes with the background in a deliberate way! Not just "a flower in front of a mountain" but "these particular warm orange poppies in front of this cool blue-gray mountain ridge."
Focus Stacking: Getting Everything Sharp From Front to Back
Here's the honest technical challenge of wildflower-plus-mountain photography: optics make it genuinely difficult to get a flower one foot from your camera and a peak three miles away both in sharp focus in a single frame.
Stopping your aperture way down (f/16, f/22) extends your depth of field, but introduces a problem called diffraction and at very narrow apertures, lens performance actually degrades and your images can get subtly softer overall, even as more of the scene falls within the technically "acceptable" focus range.
Focus stacking solves this elegantly. Instead of one compromise exposure, you take three (or more) images from a tripod. Each image focused at a slightly different distance then you blend them together in editing to create a single image that's sharp from the nearest petal to the most distant peak!
Here's how to do it in the field:
Focus Stacking Step by Step
Before you begin: Mount your camera on a tripod. Set your aperture to f/8 or f/11. Wide enough to avoid diffraction, narrow enough to give you reasonable depth of field in each frame. Use a remote shutter or your camera's 2-second timer to avoid touching the camera between shots.
Image 1 — The Near Focus: Focus on the closest element in your composition your auto focus square. The nearest flower, petal, or leaf in the foreground. Make sure it's sharp. Take the shot.
Image 2 — The Middle Focus: Without moving the camera, refocus or place your auto focus square on the middle ground of your scene or whatever is roughly halfway between your nearest subject and your most distant subject. In an alpine wildflower composition, this might be the middle of the flower field or the near slope of the mountain. Take the shot.
Image 3 — The Far Focus: Refocus or place your auto focus square on the most distant element you want sharp like the summit, the horizon, the far tree line. Take the shot.
Do NOT move the camera between any of these shots. This is why a tripod is essential as even a slight camera shift between frames makes the blending step in editing significantly harder or impossible.
Blending the Focus Stack in Photoshop
- Open all three images in Photoshop as layers in a single document (File → Scripts → Load Files into Stack)
- Select all three layers in the Layers panel
- Go to Edit → Auto-Align Layers (choose "Auto" as the projection method) as this corrects for any tiny shifts between frames
- With all three layers still selected, go to Edit → Auto-Blend Layers
- Choose "Stack Images" and check "Seamless Tones and Colors"
- Click OK. Photoshop will analyze each layer, determine which areas are sharpest in each image, and automatically create a blended composite
- Flatten the image and continue editing as usual
The result is a single image with genuine sharpness from the closest foreground element to the most distant background! This is something no single exposure can reliably achieve!
Managing Difficult Light: Histograms, Highlights & Blue Sky
Wildflowers combined with bright sky are a classic exposure challenge! The flowers may be in shade or soft light while the sky is orders of magnitude brighter. Getting both right in a single frame requires attention!
Watch your histogram, not just your screen. Camera screens lie to you outdoors! The bright sun makes them look darker than they are, leading you to overexpose. Your histogram doesn't lie. Any time you're including sky in a wildflower composition, check that your histogram's right edge isn't clipping (being cut off)! That means your highlights are blown out and that information is gone, unrecoverable even in RAW editing.
Expose for the sky, not the flowers, then recover the shadow detail in editing. This is almost always the better trade-off. A blown-out white sky cannot be fixed. Dark foreground flowers can be brightened significantly, especially if you're shooting RAW.
Use a graduated neutral density filter (physical or applied in editing) if the brightness difference between your flower foreground and the sky is extreme. A 2-stop or 3-stop GND darkens the top portion of the frame where the sky lives without affecting the bottom portion where the flowers are.
Shoot in RAW, always. The latitude RAW files give you for recovering shadow detail in flower foregrounds while simultaneously pulling back a bright sky is genuinely remarkable and unavailable to JPEG shooters.
Consider shooting when the sky isn't in your frame. Some wildflower images are dramatically improved by pointing your camera down or across rather than up, thus eliminating the exposure challenge entirely!
Using a Diffuser for Even, Beautiful Light
Here's one of the most underused tools in outdoor flower photography, especially for close-up work: a collapsible diffuser held (or propped) between the sun and your subject!
Harsh midday sun creates exactly the problems you don't want in close-up flower photography: deep shadows in the interior of the flower, blown-out highlights on the petals facing the sun, and a flatness that makes three-dimensional petals look like cutouts. A diffuser converts harsh directional sunlight into soft, even, beautiful light! Essentially turning a bright sunny day into something closer to open shade, but with warmer color than actual shade.
Positioning the diffuser: Hold or prop it between the sun and your flower subject, close enough to the flower that the softened light covers your entire composition. You'll see the shadows immediately soften and fill in when you get the angle right.
A second set of hands helps enormously. If you're shooting solo, a small clamp or a flexible holder can hold a diffuser in place while you operate the camera, or just prop it against a rock or pack if the terrain allows.
Diffusers also work for portraits of people in harsh sun, for the same reason, so if you've invested in one for flower photography, you'll find it useful across many other situations!
The 5-in-1 reflector kit is worth knowing about if you don't already have one: usually includes a diffuser panel plus gold, silver, white, and black reflector panels in a collapsible zip case for around $20-30. The black panel can also be used to block light and add drama to a side of a flower that's catching too much fill light from a bright background! A whole new level of photography!
One note if you do NOT have a diffuser: Just use your body to block the sun from the flowers. The light will not be as beautiful as a diffuser, but it will cause a shadow with even light over your subject.
Flowers You Don't Have to Hike For
Not every wildflower image requires alpine elevation, trail miles, or a specific destination. Some of the best wildflower practice you'll ever do is within walking distance of where you're standing right now!
Roadside shoulders and fence lines in rural areas are often full of wildflowers that almost nobody photographs specifically Queen Anne's lace, chicory, thistles, black-eyed Susans, daisies, goldenrod, and dozens of local species that appear unglamorous at a glance but photograph beautifully when you get close. Pull over safely, get low, and spend an hour shooting what's available. You'll be surprised!
Your own neighborhood has far more photographic potential than most photographers give it credit for. Dandelions in a lawn are genuinely beautiful in the right light. Clover at macro distance reveals a complexity most people never notice. A weedy vacant lot in full summer growth contains more color, texture, and insect life than it might appear to at walking speed. So go find the extraordinary in the ordinary!
Community parks, botanical gardens, and even well-kept roadsides often have significant wildflower plantings, especially in areas with native plant restoration programs. These aren't "wild" in the purest sense, but they're often more accessible and consistent for practice.
Practice Ideas to Build Your Skills
Practice 1 — The One-Hour Neighborhood Challenge: Set a timer for one hour. Walk within a two-block radius of your home. Your only assignment: photograph flowers (wild, planted, weedy, doesn't matter) using three different techniques like fill the frame close, use as a foreground element, and backlight one. You cannot leave the neighborhood and you cannot wait for "better" flowers. Work with what you find!
Practice 2 — The Focus Stack Practice Run: Before taking a focus stack into the field on a hike, practice the technique in your backyard or a park with a simple setup. A flower in a pot, placed a few feet in front of a background object (a fence, a tree, a building). Practice your three-frame sequence, blend it in Photoshop, and see what worked and what didn't before you're depending on the technique at the top of a mountain.
Practice 3 — The Diffuser Light Experiment: On a bright sunny day, find any flower in direct sun. Photograph it without a diffuser. Then hold your diffuser (or even just a piece of white tissue or a sheer white fabric just anything translucent) between the sun and the flower, and photograph it again with diffused light. Compare the two images. This is the fastest way to understand what a diffuser actually does for your photography, and it will make you reach for one automatically once you've seen the difference!
Practice 4 — The Histogram Game: Next time you're including sky in a composition, turn on your histogram display (most cameras can overlay this in live view or show it after every shot) and shoot the same composition three times: once properly exposing for the sky, once for the flowers, and once somewhere in between. Compare what's recoverable in each frame in editing. This exercise will fundamentally change how you approach exposure decisions outdoors!

A Few More Things Worth Knowing
Wind is your most unpredictable obstacle in wildflower photography, and especially for close-up work where even a slight breeze causes visible motion blur in your long-exposure or focus-stacked shots. Early morning is generally the calmest time. When wind does pick up midmorning, it often dies down again briefly around sunrise's end and in the late afternoon. Patience and timing beat any camera setting when it comes to wind. Be sure to have your shutter speed fast enough to "freeze" any motion caused by the wind. Check your image and make sure it is tack sharp with no blur. If there is still a blur, make your shutter speed even faster.
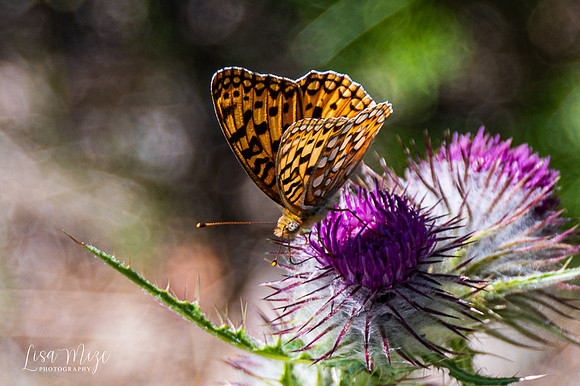
Insects make everything better. A bee landing on a lupine. A butterfly on a coneflower. A tiny beetle inside a daisy. Whenever possible, slow down enough to notice the insect life working through the flowers you're photographing! These details transform a flower photograph into a story about an ecosystem rather than just a record of a plant.
Wet flowers after rain are extraordinary. Water droplets on petals, mud on stems, the way colors saturate in overcast post-rain light. A wildflower meadow the morning after overnight rain is just beautiful. It's also when wildflower fragrance is strongest, which is its own reason to be there!
File your images by location and date. Wildflower photography benefits enormously from good record-keeping! If you know that a specific roadside location was at peak bloom on July 14th this year, you have a reasonable starting point for planning your visit next year. The wild variation in bloom timing year to year becomes more predictable the more seasons of your own notes you're working from.
Wildflower photography is equal parts planning and surrender. You can do the research, pick the timing, get to the trailhead before dawn, set up your tripod in the perfect meadow, and then the wind picks up, or the clouds roll in, or the peak bloom was last Tuesday and you're looking at a hillside of seed pods!
The photographers who consistently come home with extraordinary wildflower images are the ones who go back. Who treat a missed window as information for next year's trip. Who find something worth photographing in the seed pods because they learned to look that carefully!
The extraordinary image isn't usually at the famous meadow on the ideal day. It's wherever you're standing, once you've learned to really look.
Creating the extraordinary through YOUR lens,
Lisa