
Photography Filters for Beginners: What to Buy First

Photography Filters for Beginners: What They Do, Which System to Choose, and Where to Start
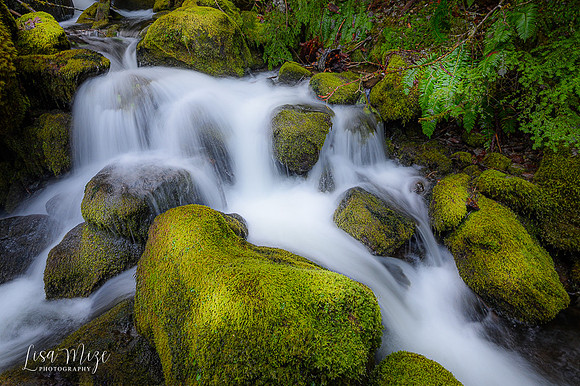

Silky water in full daylight. This one doesn't happen without filters.
I don't even remember when I started using filters. I know it was a long time ago, because I still have a little pile of old ones that fit lenses I haven't owned in years! For a long time I barely used them. Then I noticed something: I love photographing in the middle of the day. Sunrise and sunset are fantastic, of course, but when you're out traveling, hiking, or kayaking, you're out there at noon, too. And midday light can feel really limiting.
That's where filters stepped in for me. If you walk away from this post and decide filters aren't for you, I fully support that! Lots of wonderful photographers never use them. But I want to show you what they can do, so you can decide for yourself.
What Do Photography Filters Actually Do?
A photography filter is a piece of glass or resin that sits in front of your lens and changes the light before it reaches your sensor. Most filters remove light in some way: all of it evenly, part of the frame, or just the polarized glare bouncing off water and leaves.
That gives you creative control over your light. Filters can:
- Reduce glare and reflections on water, wet rocks, and foliage
- Boost color saturation and contrast, especially in fall
- Balance exposure in high-contrast scenes, like a bright sky over a shaded mountain and river
- Slow your shutter speed in daylight for silky water and streaking clouds
- Protect your lens from scratches and bumps
- Add creative effects like starbursts, soft glow, or color
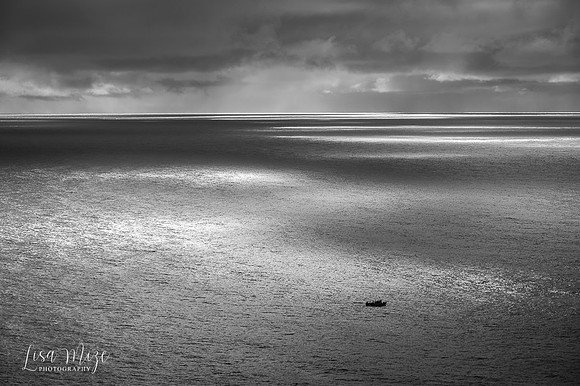
Oregon coast around 1:00 in the afternoon. Filters controlled the glare off the ocean and held detail in the clouds.
This black and white was taken on the Oregon coast at about 1 o'clock in the afternoon. The light was so bright you had to squint. Filters let me control those highlights and the glare coming off the ocean, and I kept detail in the clouds.
Physical Filters vs. Digital Filters
There are two kinds of filters. Physical filters go on your camera. Digital filters are tools in Lightroom, Photoshop, Capture One, or phone apps that you apply afterward.
I use both, but I try to get as much right in camera as I can. Post-processing is not my favorite thing! Also, some filter effects simply can't be faked later. Software can't remove glare from water the way a polarizer does, and it can't turn crashing waves into mist.
The Three Filter Systems (Choose This First!)
Before you buy a single filter, decide which system you'll use. Everything you buy later has to fit it, and switching systems halfway through is how filters turn into a waste of money.
1. Magnetic filters. You screw a thin magnetic ring onto the front of your lens. Then the filters just snap on and stack, whoop! They're fast and easy, which is great when the light is changing. They're a newer option, and I don't personally use them, but I think they're pretty cool.
2. Screw-on (circular) filters. These thread directly onto the front of your lens. They're compact, affordable, and simple, and you can stack a couple. The downside comes with graduated filters, because you can't slide the dark part up or down to match your horizon.
3. Filter holder (slot-in) systems. This is what I use. An adapter ring screws onto your lens, a holder clips onto the ring, and rectangular or square filters slide into slots. You can stack several filters and slide graduated filters to exactly where your horizon sits. That control over graduated filters is the biggest reason I chose this system.

My slot-in ND filters: 3-stop, 6-stop, and 10-stop.
Step-Up and Step-Down Rings: One Set of Filters, Many Lenses
All our lenses have different front thread sizes: 52mm, 72mm, 77mm, 82mm, and so on. You do not need to buy every filter in every size. Adapter rings let one filter fit several lenses.
- Step-up rings: They allow you to mount a larger filter onto a smaller lens thread (for example, putting an 82mm filter on a 77mm lens). Because the filter and opening are bigger than the lens thread itself, they generally do not cause vignetting
- Step-down rings: They force a smaller-diameter filter onto a larger-diameter lens thread. This physical aperture bottleneck blocks the outer edges of the light path, causing dark or clipped corners (vignetting), especially on wide-angle lenses.
|
Lisa's tip: Buy your filters (or holder adapter) for your largest lens, then use step-up rings for the smaller ones. Rings only work between sizes that are fairly close. A 52mm-to-82mm jump isn't practical. |
To find your thread size, look at the front of your lens barrel or the inside of the lens cap for a number with a ⌀ symbol, like ⌀77. My Nikon lens is 77mm and my landscape lens is 82mm, so I have a ring for each.
The Great UV Filter Debate
Want to start an argument in a photography Facebook group? Bring up UV filters!
UV filters are clear. In the film days, they cut haze, which really mattered. Digital sensors don't need much help with that, and dehaze is easy in post. Today most people use a UV filter to protect the front of their lens. Breaking a filter costs a lot less than breaking a lens.
Here's what matters most: if you use one, use good glass. If you put a cheap $10 filter in front of a $1,500 lens, your expensive lens is now looking through a cheap piece of glass.
Warning: Adding a UV filter can cause ghosting, internal reflections, and concentric ring artifacts when shooting the aurora or the Milky Way. Be sure to take off your UV filter before night sky photography!
How to Buy Filters Without Wasting Money
- Know your thread sizes before you shop.
- Pick your system first (magnetic, screw-on, or holder), then add one piece at a time.
- Glass vs. resin: resin is cheaper and fine for experimenting, but it scratches easily. Glass costs more and lasts.
- Look for good coatings. Brands coat filters differently to resist fingerprints, oil, water spots, and color casts.
- Trusted brands to start your research: B+W, Hoya, Lee, Cokin, Haida, and NiSi.
- Rent before you buy expensive or specialty filters. Many camera shops and rental houses carry them.
- Get a filter wrench. A screw-on polarizer has a spinning outer ring, so it's easy to get stuck on your lens. I've done it more times than I can count! A cheap rubber or plastic filter wrench with "teeth" grips the threads so you can get it off.
My Filter Roadmap: Where to Start
People always ask, "Lisa, where do I start?" Here's the order I recommend:
- Circular polarizer (CPL). If you only ever buy one filter, buy this one. It's on my camera about 95% of the time when I'm not shooting wildlife.
- 10-stop neutral density (ND). This is your ticket to ghostly ocean water and streaking clouds in bright daylight.
- Graduated ND (GND). Balances a bright sky with a darker foreground, right in camera.
- Different strengths of ND's and GND's.
- Creative filters. Star filters turn twinkle lights and streetlights into little starbursts (super fun with kids). Diffusion and soft-focus filters give that dreamy old-Hollywood glow. Close-up "macro" filters let a regular lens focus closer. Infrared filters turn green leaves white. And color filters can warm or cool a scene. They're wonderful for pulling yourself out of a creative rut.
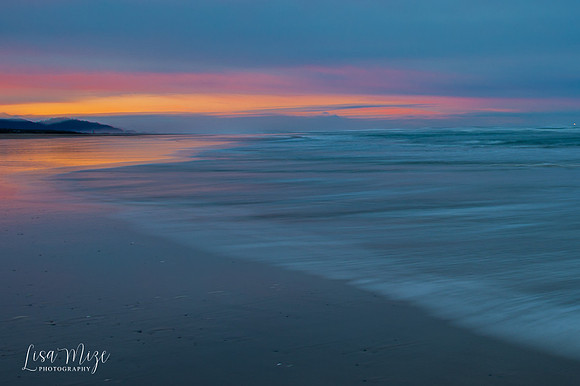
Morning long exposure at Rockaway Beach, Oregon. I couldn't have slowed the shutter enough without an ND filter.
Most of all, have fun. Pick a project, like "I've always wanted silky waterfalls," and figure out which filter gets you there. Your filter choices become part of your style.
|
Your next step Want to learn more? Check out my recorded teaching here. Sign up for my email list at lisamizephotography.com so you never miss one, and keep reading the rest of this filter series. The polarizer post is next! |